Table of Contents
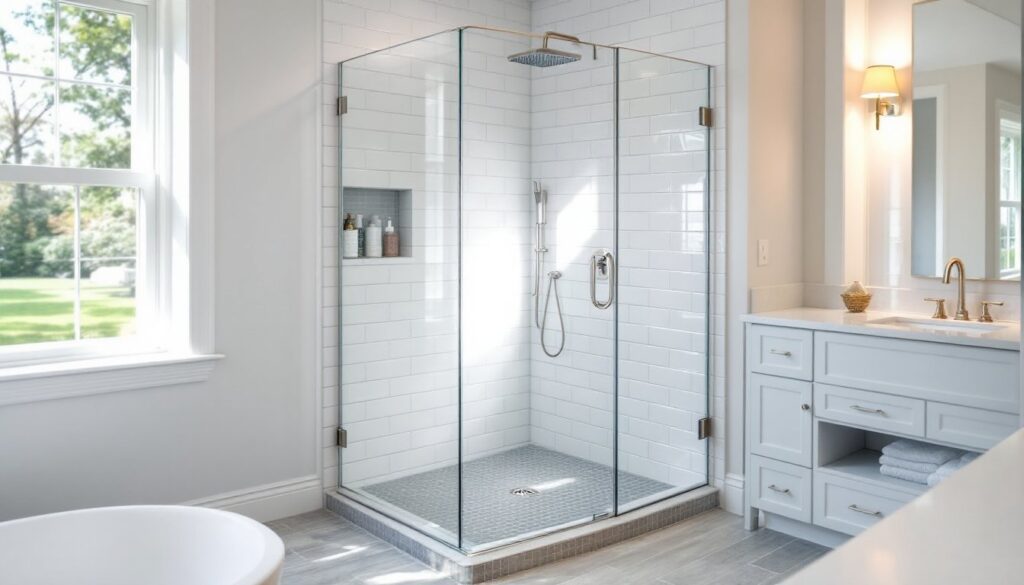
ToggleA well-designed corner walk-in shower can be a game-changer for any bathroom, regardless of square footage. Unlike traditional shower enclosures that eat up wall space with a swing-out door, a corner walk-in shower maximizes your layout by tucking neatly into the room’s angles. Whether you’re renovating a cramped bathroom or upgrading an outdated setup, understanding how to plan, design, and install a corner walk-in shower is the key to creating a functional, modern space that feels larger than it actually is. This guide walks you through the essentials so you can tackle the project with confidence.
Key Takeaways
- A corner walk-in shower maximizes bathroom space by eliminating a swing-out door and reclaiming 3 to 4 extra feet in compact layouts, making it ideal for smaller homes or apartments.
- Proper slope (1/8 inch per foot toward the drain) and waterproofing membranes are essential for preventing standing water, mold, and structural rot in your corner shower installation.
- Use glazed ceramic or porcelain tile with slip-resistant finishes, epoxy grout, and tempered glass enclosures to ensure durability, safety, and a modern aesthetic in your corner walk-in shower design.
- Critical DIY mistakes to avoid include skipping waterproofing, failing to slope the floor, and not caulking corners with flexible silicone—these oversights cause most corner shower failures.
- Accurate measurements, existing utility assessment, and building permit verification should be your first steps before measuring and planning a corner shower layout.
What Makes Corner Walk-In Showers So Popular
Space Efficiency and Layout Advantages
Corner walk-in showers are built into the intersection of two walls, which eliminates the need for a swing-out door. This means you reclaim precious floor space, sometimes an extra 3 to 4 feet in a compact bathroom. They work especially well in smaller homes or apartments where every square inch counts. Because the shower occupies the corner rather than protruding into the room, furniture placement and traffic flow become much easier to manage.
Another advantage is flexibility in fixture placement. Water lines and drain stubs can be run along either wall, giving you options when planning the plumbing layout. Many homeowners find they can fit a corner walk-in shower in spaces where a traditional stall simply wouldn’t work.
Design Flexibility and Modern Aesthetics
Corner showers have moved beyond utilitarian boxes. Today’s designs include frameless glass enclosures, custom tile layouts, and integrated bench seating. You can run tile in herringbone patterns, install a rainfall showerhead, add a steel-framed glass enclosure for an industrial-modern look, or keep things simple with clean lines and neutral tones.
The corner location also lets you make a design statement. Whether you’re going minimalist or building a spa-like retreat, a thoughtfully designed corner walk-in shower becomes a focal point that elevates the entire bathroom’s appearance. You’re not constrained to standard sizes or prefab kits, custom corner layouts let you match your home’s style and your own preferences.
Essential Design Considerations Before You Build
Measuring and Planning Your Corner Shower Layout
Before ordering materials or breaking into walls, measure twice. Start by measuring the corner where your shower will sit. Use a tape measure to get the dimensions of both walls, typically you’ll want a minimum of 36 inches on each wall to create a usable corner shower space. Many builders prefer 42 to 48 inches for more comfort, but 36 inches is code-minimum in most jurisdictions (check your local building code: requirements vary by region).
Next, identify existing utilities. Where are the water supply lines? Where’s the drain roughed in? If you’re installing a walk-in shower in a spot where plumbing doesn’t exist, you’ll need to run new supply lines and a drain, this can be doable for a handy DIYer, but it’s often worth calling a licensed plumber to avoid costly leaks later. Verify whether you need building permits: structural changes, moving drains, and new plumbing usually require inspection in most areas.
Consider slope and drainage. A corner walk-in shower needs a sloped floor (typically 1/8 inch per foot toward the drain) so water doesn’t pool. If you’re building on a concrete slab, you may need to use a pre-formed shower pan or build a sloped base with mortar. On a wooden subfloor, a pre-fabricated base or a properly sloped concrete subfloor layer is essential, water sitting under your shower is a fast path to rot and mold.
Think about glass enclosure options too. A frameless corner enclosure looks sleek but costs more and requires precise measurements. A semi-framed or fully framed enclosure is cheaper and more forgiving if your walls aren’t perfectly plumb. Both work well in a corner: it’s a matter of budget and aesthetics. Measure your corner’s height as well, standard ceiling height is 8 feet, but the actual distance from your future shower floor to the ceiling matters for glass sizing and ventilation clearance.
Choosing Materials and Finishes
Your corner walk-in shower’s durability depends on material choices. Tile is the most common finish, it’s water-resistant, durable, and comes in endless styles. For walls, use glazed ceramic or porcelain tile rated for wet areas (look for a water absorption rating of 0.5% or lower). For the floor, choose slip-resistant tile: avoid polished marble or smooth glazed tiles in the shower itself, as they become dangerously slippery when wet.
Grout and waterproofing matter just as much as the tile. Use epoxy grout rather than standard cement grout in a shower, it resists moisture better and lasts longer, though it’s harder to work with if you’re going the DIY route. Before tiling, apply a waterproofing membrane to all walls and the floor. Brands like Schluter, Kerdi, or similar systems prevent water from sneaking behind your tile and rotting the structure. This step looks expensive but saves you thousands in repairs later.
If you’re not a tiler, acrylic or fiberglass panels are an alternative, though they’re less durable long-term and can look cheaper. Glass finishes, ranging from clear to frosted, define your enclosure look. Tempered glass is essential for safety: standard glass can shatter into sharp shards if it breaks. A clear glass corner enclosure feels more open: frosted or textured glass adds privacy while still looking modern.
For fixtures, mid-range options (think brands available at most home centers) perform well for years if installed correctly. Splurging on a quality rainfall showerhead can transform the experience without very costly. Avoid super-cheap fixtures that corrode or lose pressure quickly.
Installation Tips for DIY Success
If you’re tackling a corner walk-in shower as a DIY project, here’s the realistic breakdown: framing, plumbing, and waterproofing are the critical steps. The finish work (tiling, caulking, hardware) is where you can save the most money by doing it yourself, but you’ll need patience and attention to detail.
Prep work is non-negotiable. Remove old fixtures and tile carefully. If you’re demolishing an existing shower, wear a respirator and eye protection, old tile, especially pre-1980s, may contain asbestos, which requires professional removal. Once the area is stripped, inspect the walls and subfloor for rot or damage. Rotted framing must be replaced before you proceed: ignoring it now means a failed shower and hidden structural problems later.
Frame the threshold and floor. If you’re starting from studs, build a recessed frame for your shower base. A pre-fabricated shower pan simplifies this, just level it, check the drain fit, and proceed. If building with mortar, slope the base 1/8 inch per foot toward the drain. Use a level constantly: even slight slopes cause water to pool or drain unevenly.
Run plumbing and ventilation. Supply lines can be rigid copper or PEX (cross-linked polyethylene): both work equally well if installed correctly. A licensed plumber should handle this if you’re unsure, especially for the drain rough-in. A slope of at least 1/4 inch per foot on drain pipes prevents slow drains and backups. Ensure adequate ventilation, either a dedicated exhaust duct to the outside or, if connecting to existing ventilation, verify the duct isn’t already overloaded.
Waterproof before you tile. Apply a liquid or sheet membrane over all walls and the floor. Overlap seams by at least 6 inches. This is tedious but essential, it’s your insurance against leaks. Let it cure per the product instructions before tiling.
Tile carefully. Use thin-set mortar (not mastic) for shower walls and floors: thin-set bonds better to damp areas. Butter each tile on the back and press firmly. Maintain consistent grout joints (typically 1/8 to 1/4 inch). Once set, grout with epoxy and caulk corners with flexible silicone, not grout, corners need to move slightly without cracking.
Install glass enclosure. Measure three times. A frameless corner enclosure requires precise measurements: any deviation shows immediately. Standard framed units are more forgiving. Follow the manufacturer’s installation guide exactly, and use proper shims and silicone to secure the frame to the walls. Don’t rely solely on caulk to hold glass in place: it should be mechanically fastened.
Common mistakes to avoid: Not sloping the floor (leads to standing water), skipping waterproofing (leads to hidden mold and rot), using non-slip floor tile improperly (if grout joints are too wide, dirt collects), and not caulking corners and seams (water finds cracks). Most DIY corner shower failures stem from skipped prep, not from lack of skill with tile or glass.
For the entire project, budget 2 to 4 weeks if working part-time. If plumbing is complex or you’re inexperienced with tile, having a professional handle portions like rough plumbing and waterproofing frees you to tackle finish work and saves costly do-overs.
Making Your Corner Walk-In Shower a Reality
A corner walk-in shower is a smart, modern solution for bathrooms of any size. The space savings, design flexibility, and sleek look make it worth the effort and planning. Start with accurate measurements, understand your plumbing layout, don’t skimp on waterproofing, and take your time with finishing details. Whether you handle the entire project or bring in professionals for the technical bits, a well-built corner shower will deliver comfort and value for years to come.